Eventing with the Best
Published 4:25 pm Thursday, December 7, 2017
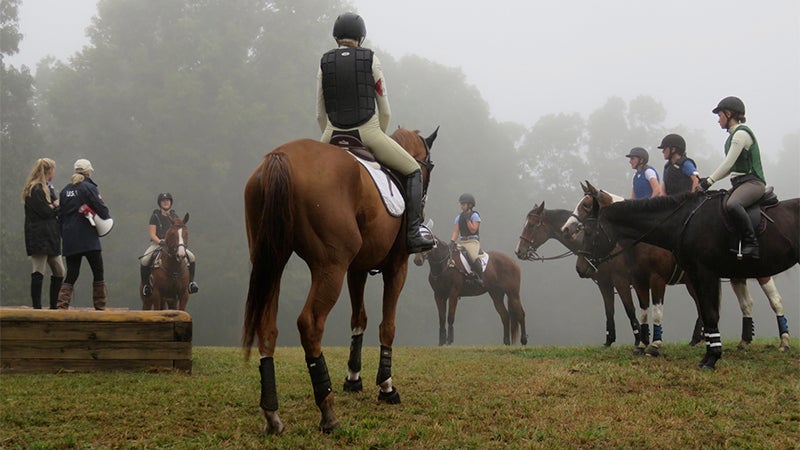
- Karen O’Connor (with megaphone) prepares for cross-country work with the Training/Prelim riders. (Photo by Judy Heinrich).
It’s not often that amateur athletes can get personal instruction from someone who’s reached the pinnacle of their sport. So it’s no wonder the October Karen O’Connor Clinic, sponsored by the River Valley Pony Club (RVPC), filled all 18 of its riding spots and had more than 40 auditors attending.
Karen O’Connor has been on the U.S. Eventing Team at five Olympic games, winning Team Silver in 1996 and Team Bronze in 2000. At the 2012 Olympics, she was the oldest athlete representing Team USA and the oldest female worldwide in the entire games. She was also the highest placed American, finishing 8th in a field of more than 60 riders from 13 nations.
Karen also won Individual and Team Gold at the 2007 Pan American Games, has ridden in five World Equestrian Games and Championships, won the Rolex Kentucky Three-Day Event three times, and was named the U.S. Female Equestrian of the Year 10 times.
Karen stopped competing shortly after the 2012 Olympics when she broke her back in an on-course fall, with injuries that required two 11-inch titanium rods and 16 three-inch screws for stabilization. She now keeps busy with the longtime teaching/training/sales business she shares with her husband, David; traveling to give clinics and source horses for upper level and aspiring riders; and as coach of Mexico’s National Eventing team. “We have the Central American Games next year, and hopefully WEG, then the Pan Am Games and hopefully the Olympics,” she says of Team Mexico’s goals.
The October Tryon clinic was Karen’s second in our area after being TIEC’s first-ever clinician in 2014. This year’s clinic was held at Eric and Trayce Dierks’ Renovatio Farm for show jumping and Jim and Ann Troppmanns’ Fox Knoll Farm for cross-country.
Clinic organizer and RVPC District Commissioner Ivette Drumgool thanked the Dierks and Troppmanns for hosting at their beautiful farms, Farm House Tack and Hare & Hound for providing beautiful boxed lunches both days, and the many volunteers who helped make the event a success.
Starting with Lectures
Karen always starts clinic days with a morning “classroom” lecture so participants can focus, ask questions and take notes without the distraction of having horses in hand. Day 1 focused on show jumping and Day 2 on riding cross-country.
With permission from RVPC and Karen herself, I’m summarizing information from both morning lectures, much of which applies across riding disciplines. More details and advice for individual horse-and-rider pairs came at the riding portions of the clinic, which followed the lectures and took up the better part of both days. Riders were split into three groups of six: Training/Prelim (the most advanced at the clinic); Novice (with some planning moves up to Training); and Beginner Novice.
For those readers serious about eventing, you might want to start saving for a riding spot in a future clinic with Karen, whose experience and accomplishments in the sport remain unmatched.
Day 1: Horsemanship & Show Jumping
Karen started her Day 1 lecture talking about getting the most out of clinics and some points on general horsemanship before focusing on Show Jumping. (Unless indicated otherwise, the words you’re reading from this point forward are Karen’s.)
“People come to a clinic to watch someone they assume knows what they’re talking about,” she said. “And the clinician wants to give you as much help as he or she possibly can.
“As participants, you should be giving 110 percent of yourselves even if it doesn’t seem to make sense at that moment. Even if I’m going down a road you’ve never gone before, try to go with me. If you take away one new piece that can go with you the rest of your riding career, that’s terrific. Take pieces from here and there and build your own style within a foundation that’s very clear and systematic.
“When we get to the riding part, you’ll be listening as I talk to other people, but don’t fall into the clinic trap of letting your horse just graze or do nothing as you stand and listen. If you do that, your horse won’t be switched on or in front of your leg when it’s your turn. So when your turn is coming up, start one or two horses ahead to get some adrenaline in your horse and make sure he’s ready.
“You should also come away understanding not just what a horse does, but why. The difference between people and horses is that people are smart and horses act on instinct. They are prey animals by nature, born with the ability to run, whereas people are predators. When prey animals see a predator, their instinct is to get away by running a short distance, reassessing, maybe running again, or possibly seeing that the predator has given up.
“It’s a unique relationship between horses and humans. We predators are born to hunt, eat, sleep, do it again. Prey animals are moving all the time, eating all the time. But we’re able to take the normal instincts of horses and get them to fit into our world.
“Even in our world, a horse likes a variety of things in his day. If we take a horse out to ride for an hour and then he’s in his stall for 23 hours, that’s not meeting the horse’s needs. So think of some things to do: just being around him, picking things to do whether it’s hand walking, ground work, grooming or grazing.
Communication
“Horses don’t understand our language, so how do we communicate with them? Through physical aids. That’s across the board… all riding disciplines rely on our giving aids, which is ‘talking with our bodies.’ We have five natural aids: seat, legs, voice, hands and weight.
“We squeeze with our leg, literally pushing our muscle into the horse’s muscle, and we want the horse to respond by moving away from the pressure. If he pushes back into you, you have to add ‘volume’ to get the response you want. So you add more pressure with your leg until he moves away. Then you release the pressure, which is his reward. The rider puts on pressure, the horse moves away, the rider releases.
“If you keep the pressure on, the horse doesn’t like it and can get dull to your aids, get anxious, or become disobedient. The goal is to be slow to put pressure on and quick to release it.
Levels of Pressure
“There are five levels of pressure for aids. The lightest amount is ‘air’ – you can just gesture with your hand in the air or move into his space and the horse knows you want him to move away. The second level is ‘hair,’ when just a light touch gets the response. The third level is to put pressure a bit deeper, on ‘skin.’ The fourth level puts pressure on ‘muscle,’ and the fifth is putting enough pressure that you would actually feel ‘bone’ underneath. Early in teaching something, you may have to start with ‘bone’ and then move quickly back through ‘muscle,’ ‘skin,’ ‘hair’ and ‘air’ as your horse understands.
The horse has to be submissive – when you put pressure on, the horse has to move away from it. You guys are event riders and that’s great – but first you’re riders. The largest part of the education is to learn to talk to the horse with your body, whether you’re going around a barrel or jumping down a six-foot bank.
Responsibilities of Rider to Horse
“The first responsibility of the rider is to give the horse direction, whether it’s where you’re going in the arena or how the horse should walk out of his stall so he doesn’t hit his hip on the wall. The second responsibility of the rider is to set the appropriate speed for what you’re doing. The third responsibility is for the rider to be doing everything within the balance of the horse. And the more difficult the action, it also has to happen within the rhythm of the horse – a horse has rhythm in everything he does. When you’re first learning to ride, it’s all about keeping still and having your heels down. As you progress in your lessons, the focus becomes all about moving with the rhythm of the horse.
“The final rider responsibility is timing, which in jumping has to do with being able to see your distance and pick a take-off spot that’s appropriate for the horse. It’s not rocket science but you have to learn technique in order to have the timing you want.
“Where is the engine of the horse? In the rear. The horse creates power through the bend of its hind leg, bringing it up in a circle and then down, like a spring. When a horse bends its front leg under its body, it’s actually preparing to lie down – lying down is all it can do when it bends its weight over a front leg. But when he bends a hind leg he is gathering power. That’s why you want the horse on the hind leg – that’s where the spring and the power are.
“The faster a horse goes, the more its center of gravity is forward, so you don’t want to just go into a show jumping ring and speed the horse around. To jump, the horse has to be back on its hind legs, get them to bend, and get some trajectory.
“How do you pick a good distance to a jump in show jumping? There are several things to look at: The front face of the jump: is it vertical or ascending? That will tell you where the horse needs to have the highest point of his arc. You also have to look at what’s behind the front face: Is there nothing? Is there a right turn? Are you in a jump-off and have to do a roll-back? You need to know what’s coming behind the jump.
“Next is the actual jump itself: is it colorful, is it a ditch, will the horse be scared? What will you have to do to keep the horse comfortable? We have to think about all the things that might scare a horse. And what might a horse do if he’s uncomfortable? He could shift his shoulders or drop his mouth so he’s ‘empty’ and all the weight falls back into your leg. It’s always your job to keep the horse in front of your leg.
SJ Rider position
“In dressage, your base of support is in your seat, with help from your core. In show jumping the most important part of your body is your lower leg. You won’t have the same level of speed as in cross-country to help you with impulsion, so you need your lower leg to create both impulsion and the engagement of the hind leg, to get that spring that creates the trajectory.
“We use three positions in show jumping. The first is full seat, which is like sitting with your butt completely in the saddle – you surrender your body to the saddle, to the horse’s back.
“Then there is two-point, where your butt is out of the saddle, not touching it at all. In show jumping we use two-point for ‘time around’ issues – to get across the arena in the fastest time you can.
“Last is three point – your butt touches the saddle but doesn’t surrender to it; you are carrying some of the weight in your legs. If you’re riding in three-point and your leg muscles are burning just above your knees, it means you’re not fit enough.
“The best way to strengthen your lower legs is to drop your stirrups. If you’re asked to do a course and you don’t have any stirrups, it shouldn’t look any different. I can jump a 1.4 meter course and higher with no stirrups.
“The biggest problem I see with event riders is not having a landing strategy. You have to know what’s coming up next and what you have to do. It’s never just about the jump, it’s always the things before and after the jump – the jump is just part of the pattern.
“If you land and find your horse is not available to you, you have to engage to get control. Do a downward transition within the gait or change the gait. Make a circle – the first thing trainers say when the pony is running away! If your horse lands and then jumps off to one side, use a lateral movement to get the hind engaged. The whole point is, it’s about the horse, but making things simple for the horse can be very complex.
(At the end of the morning lecture, the first group of riders prepared for their show jumping lesson, which was done with the other riders, auditors and volunteers there to watch and listen. Karen not only analyzed and instructed in the riding session, she also got on and rode a bit to demonstrate particular points.)
Day 2 Cross-Country
Karen started the morning talking about safety when riding cross-country. “Riding cross-country is a game of footwork of the horse and instincts of the rider. It’s about staying in the moment and staying committed to your plan.
“Usually you walk your course before you ride in the competition, you don’t just go out there. Why? To know where you’re going, evaluate the jumps, make your plan. Some riders walk the course three times, spend 10 minutes at each jump with their trainer, then come out to ride it and their plan is just gone. You have to try to stick to your plan.
“Some specific tack advice for cross-country: Tie a knot at the end of your reins just above the buckle, because the buckle is the weakest point of the reins. And I’m a real advocate of holding a bridge in the reins, which came from horseracing. I like a single bridge: open your non-whip hand and lay the rein across it, and make a short single bridge to the other hand that leaves you with a nice long rein. Then gather your reins into position and put your hands down into the neck.
“We carry a whip as an extension of our leg. Your horse can’t be afraid of the whip. How do you teach that? The wide part of the whip has to be absolutely quiet and not in the equation until you need it. Put an elastic around the handle and slip your middle finger in there; then you won’t lose the whip. Place the whip against your thigh and when you need to use it, move your whole arm back from the shoulder, then straighten your elbow and the whip moves down by the haunch.
Cross-Country Rider Positions
“In cross-country there are three things going on: galloping between the jumps, getting ready for the jump, and actually jumping the jump. So you’ll use three galloping positions – the first galloping position, a preparation position, and a jumping position – and go seamlessly from one position to the other. It’s repetitive, and that’s true between jumps and in combinations with A, B and C elements, etc.
“In the first galloping position you want to look like a race rider, low in the saddle. Where should your foot be in the irons? Not just touching the base of your toe like in dressage or show jumping – you want your foot a little further in. Not at the back of the arch where your heel starts – that’s a safety position when you’re in trouble. You want your iron at the back of the ball of your foot; that’s the base of your position and will stabilize your lower leg.
“You want to be ‘base wide’ – wide at the bottom and narrow at the top. Your stability starts with your foot then the whole knee area. You have to keep your kneecaps in, which is easier now with the cushy knee rolls. Turn your kneecaps into the knee rolls and hold them there.
“In first galloping position you want to place your hands right at the withers and be still with your hands, your lower legs and your upper body. When you want to go faster, you articulate your angles and get down in there behind the horse’s shoulder blades. When you want to go slower, you raise your upper body to create wind resistance – you ‘open the sail.’
“When you’re galloping uphill you’re in the closed position. When you’re galloping downhill you go in the open sail position. And keep your lower leg perpendicular to sea level or ‘on the plumb line.’
“The second galloping position is preparing the horse for the jump, where you’ll create the direction, speed, balance and rhythm for the jump. This is the most critical part of cross-country. You made the plan on your course walk, now you have to execute the jump. If a horse is going fast on the gallop, he’s on his forehand. He can’t jump safely from that so you have to put him in balance as you’re coming to the jump.
“How far before the jump do you need to have all that put together: ten strides, six strides, three? You should be able to see your distance from five to six strides out. You need to look at the front face, what’s behind it, whether it’s skinny or wide, the terrain, whether footing is firm or not. You want to have everything ready before you have to make your final decision on the take-off spot. And for jumps with A, B, C, D it’s a bigger deal, because you have to look at all of it.
“You also have to know your horse – whether he responds to you quickly or needs more time. If you have an aggressive horse who wants the last word, it’s going to take longer. And a downhill horse will take longer to balance and time for to get his front end up.
“The first thing I’m going to do coming to the jump is drop my bridge so I have freedom with my reins. Then I open my sail to raise my center of gravity and the horse will feel the wind resistance. With your own horse you need to know if you’re going to use leverage, like leaning back, or use your leg, or use leverage and leg. If I feel a little emptiness in my hand and my horse doesn’t respond, I may move the bit side-to-side to tell him, “Get off of it!”
“In the take-off, the horse is going to come off the ground and close my position more but I’m still riding aggressively and defensively: I will change my position, lower the center of gravity, curl my tail under me.
“On cross-country we want the horse to use his head and neck as a counter balance. He will land with his head down and bring it up with the first stride, and I then bring my hands back. If you don’t do it right, you can get pulled forward and lose your center of gravity and lower leg.
“The other position you need in cross-country is for the drop fence. When a horse jumps down a drop, his body actually goes up first. A horse always jumps up before he starts down because the hind leg bends only one way. So the rider has to follow the action of the horse. I can’t lean back before the horse jumps because I wouldn’t be allowing the hind leg to push off. I have to get my butt out of the saddle first, then I fold my position within the jump. At some point in that drop I will stop my shoulders but my hips will keep swinging forward. It’s all about the hip swinging forward and back to stay with the rhythm of the horse.
“The final things that are so important on a drop are that your eye has to stay straight ahead and you have to land like you’re landing on a trampoline.
“You need to own that position, especially if your horse is bucking. A buck is like a form of drop fence. Keep your feet out in front of you and follow that center of gravity, then get his head up.
“The beauty of knowing the three galloping positions is that you can land in any position you want depending on the terrain and what’s coming up next. I can use my position to change my horse’s speed: to go faster I go down more and my butt goes out a little. To slow down, I open my sail, my hand comes up with my whip, the horse’s head comes up and the horse slows down. When you feel the hind leg come up, you can drop back.
“You’re also ‘rowing the boat,’ moving your hands back and forward. All about folding and opening. When you’re opening your sail your knees are strong into that knee roll; your ‘hinge’ is secured into that knee roll.
“It’s really important that when take your horse out for a gallop it’s not just about conditioning. It also has to be about teaching your horse how to gallop. He needs to get used to your different cross-country positions because some horses can be alarmed at changes in position. Practice getting your horse to go faster or slower with your body, raising or lowering your center of gravity to change speed. Your horse will learn to recognize those changes and know when to alter his speed and when to get ready for a jump.”
(Following the cross-country lecture the three groups of riders received instruction from Karen on a course of jumps at Fox Knoll that had been built to her specifications. Clinic auditors, volunteers and other groups of riders were again able to hear and learn from Karen’s advice.) •
Judy Heinrich is a freelance writer serving national clients in diverse industries. Judy writes for the Tryon Daily Bulletin and Foothills Magazine on all things horse related. She can be reached at jheinr@windstream.net.
More Equestrian

-
Polls
 Loading ...
-
-